DISCLAIMER: As you probably already know, this page may contain affiliate links. If you click on one of the product links, I’ll receive a small commission. Thanks!
ClickUp Custom Views are the perfect solution for when you feel like your ClickUp workspace has become cluttered and disorganized.
How does that work, you might ask?
Well, CUSTOM VIEWS allow you to filter and organize exactly what you want to see in your ClickUp dashboard. You can create customized views that focus on specific projects, tasks, team members, dates, and more.
So, if you are overwhelmed by the number of tasks, projects, and content you have stored in different lists and sections, this Ultimate Guide to ClickUp Custom Views is for you!
What Are Custom Views?
Managing a complex workflow can quickly devolve into chaos if you don’t have the right system in place, and that’s where ClickUp’s powerful custom view feature comes in to save the day!
A ClickUp custom views acts as a virtual filter for your content. It lets you define the exact parameters for what shows up in your ClickUp dashboard without having to actually move or rearrange anything. Things like status, assignees, due dates, etc. can all be used to sculpt customized views of your data.
This is extremely useful for keeping your content organized without creating unnecessary duplicate content. For example, you could create views that show:
- Open tasks assigned to you
- In progress projects
- Content due this week
- Tasks in a specific status like “Blocked”
Custom views bring harmony to your mayhem without cluttering up your ClickUp workspace with hundreds of separate lists and sections. So, yeah… I’m not even kidding when I say that the possibilities are right at your fingertips!

How to Create Your First Custom View on ClickUp
Setting up a custom view is simple, ClickUp makes it easy to add, edit, and manage as many views as you need.
Here are the basics to get you started with ClickUp Custom Views:
Step 1:
Select the space you want to create the Custom View for, and then click the “+ Add” button on the upper left-hand side.

Step 2:
Pick your preferred “Custom View” and give it a name.
- List
- Board
- Calendar
- Gantt
- Timeline
- Team
- Table
- Mind Map
- Workload
- Activity
- Map
- Whiteboard
- Doc
- Chat
- Embed
- Form

Step 3:
Apply filters like status, assignees, dates etc. to sculpt the view.
- Group by
- Subtasks
- Filters
- Me Mode
- Assignees
- Show Closed


Step 4:
Adjust or rearrange the columns in a way that makes the most sense to you.
Step 5:
Custom View is done!
And voila! You now have a bird’s eye view of the specific subset of content you need.
Here are some of the best example custom views you may find useful for staying organized:
– In progress tasks (status: In Progress)
– My open tasks (assignee: You)
– Next 7 days (due date: Next 7 Days)
– Finished last week (completed date: Last Week)
– High-priority projects (priority: High)
– Marketing team dashboard (tags: Marketing)
The choices are endless, all you need is to be specific with what you want, and then craft views to fit your workflow, team, and projects.
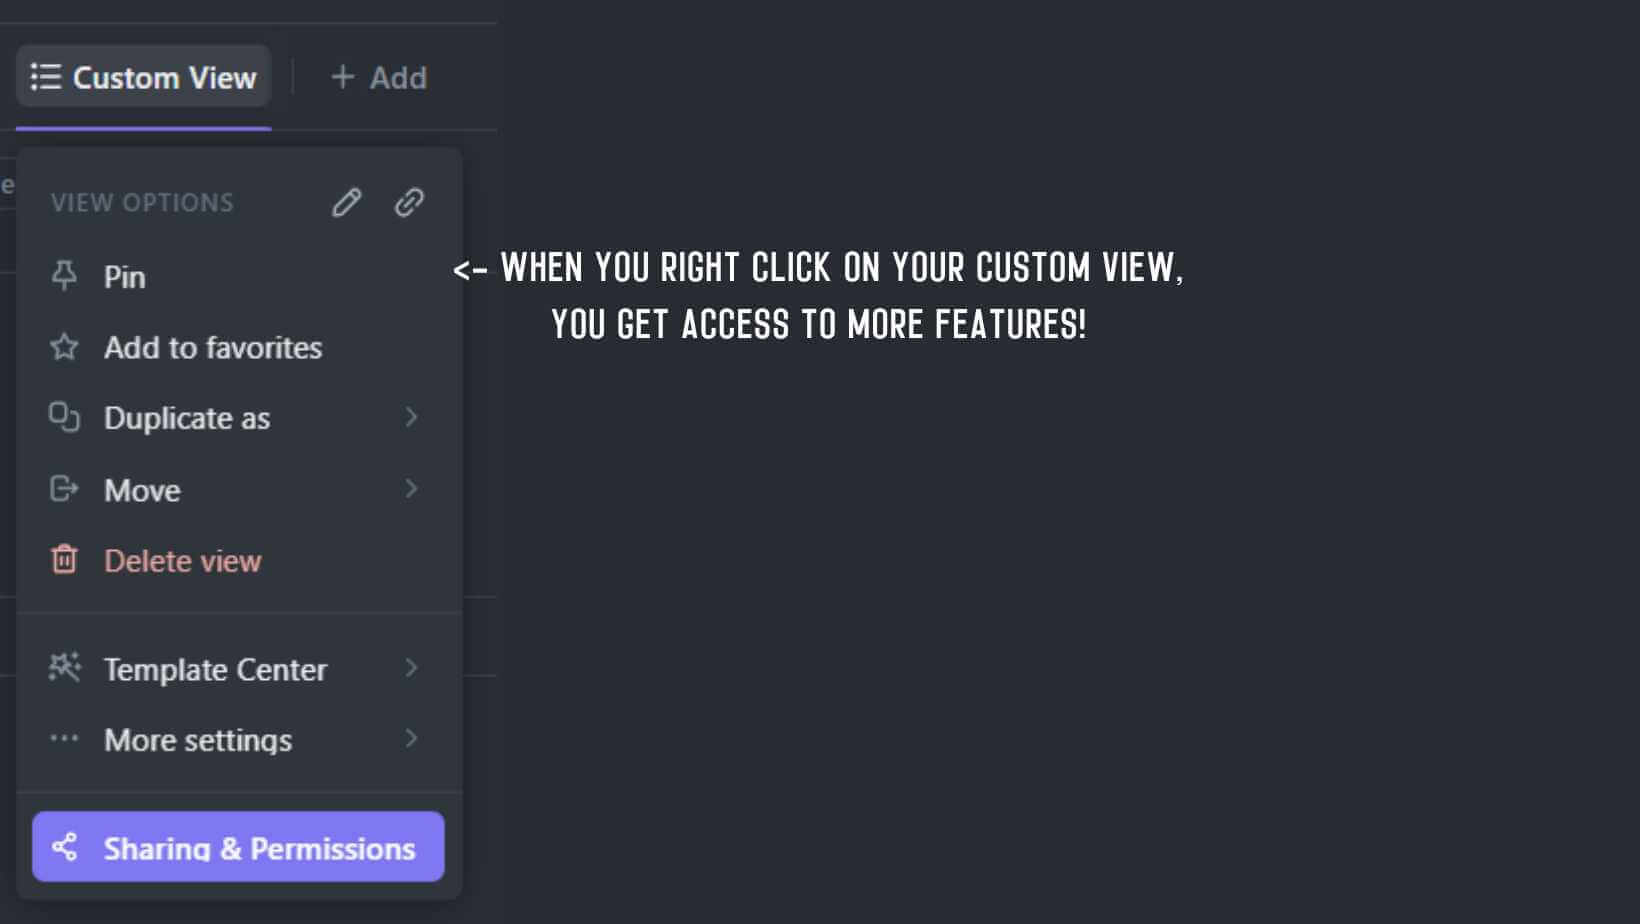
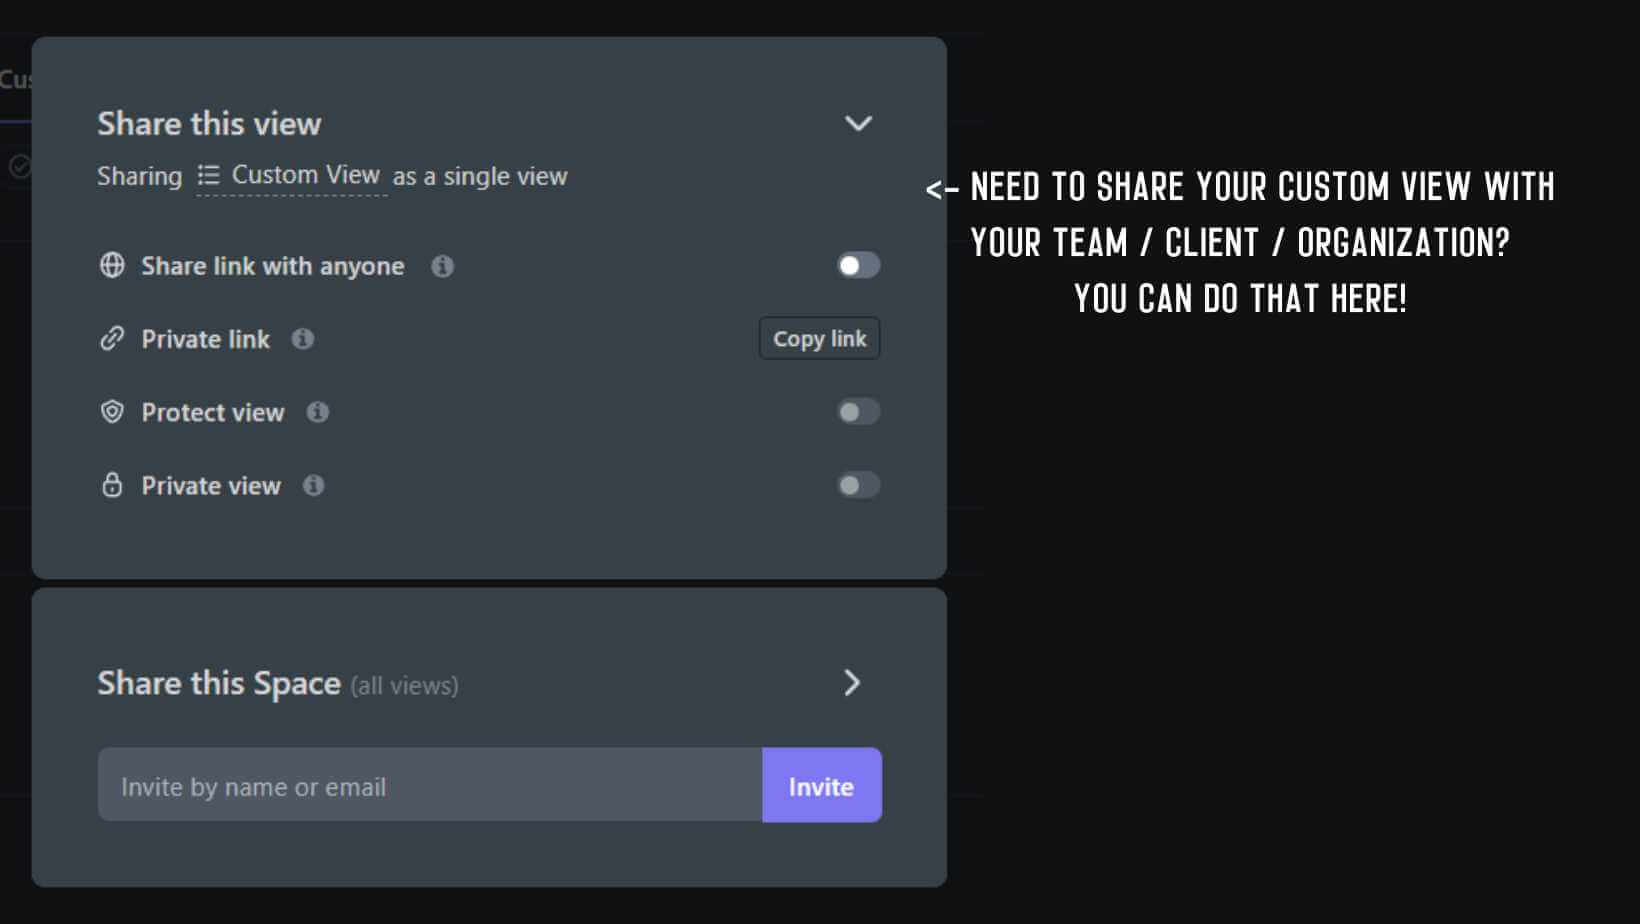
Sharing Custom Views
Once you’ve perfected your go-to custom views, you can easily share them with teammates. This allows everyone on your team to synchronize on the same filtered workflows.
To share a custom view:
- Click on the custom view you want to share
- Select ‘Sharing & Permissions’ and select preference
- Share link with everyone
- Private link
- Private view
- Permissions
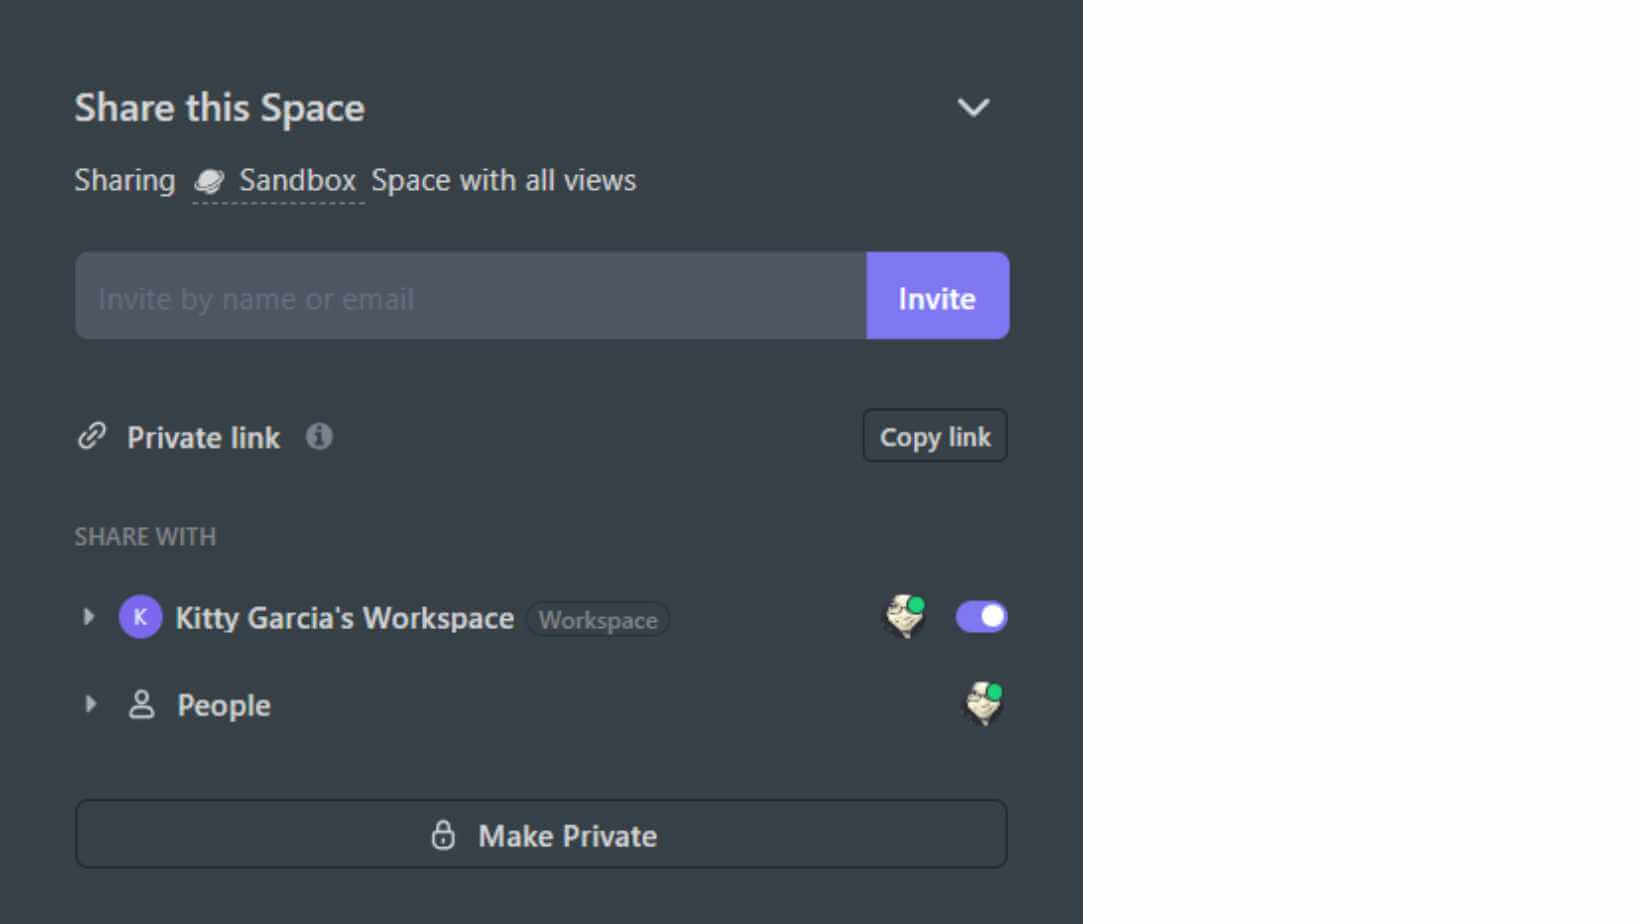
- You can also opt to ‘Share this Space’ in order to share ALL VIEWS available on that space by:
- Sending an invite by name (if they’re already on your ClickUp directory) or by email
- Private link
- Share with Workspace (people who use a specific workspace)
- Share with People (individual)
- They will now see it available in their custom views list
And it’s really as simple as that! So, I highly recommend that you start experimenting with custom views today – they truly are one of the most powerful yet underused features ClickUp has to offer!
PS – Want the full power of custom views to organize your chaos without setting things up yourself? I got you! Check out my ClickUp templates here.
PPS – Need ClickUp training and support in a community setting? Join us over at StartUp Your ClickUp!
Episode 159 Transcript + Timestamps
Organize Your Chaos:
Ultimate Guide To ClickUp Custom Views
[00:00:00] Yvonne Heimann: If you ever feel like you have so many tasks in ClickUp, but you can’t find the ones you need, when you actually need them, then custom views are about to become your new best friend, right here inside of ClickUp. In this video, I will show you exactly how to use custom views to filter, sort, and organize all of your lists and tasks. So the right information pops up at the exact right time. Right where you need them, saving you tons of time and stress.
[00:00:35] Today, we are going to talk about what custom views are, how to set them up. And at the end, I will share a couple of pro tips with you. So you better stick around because you don’t want to miss out on those.
[00:00:49] Let’s start by what are custom views with in ClickUp. Now custom views within ClickUp are possible in any of your views. [00:01:00] If that is your board view, if that is your list view, if that is your box view, your calendar view, your workload, you pretty much can apply custom views anywhere and everywhere in all of those lists.
[00:01:11] And I’m going to show you how. Now, why would you want to do that? Really simple. There’s a lot of information in ClickUp. When you are running your project management through ClickUp, there is a whole bunch of custom fields and a whole bunch of tasks and subtasks and different use cases and different departments and different tasks and all the things.
[00:01:32] So we want to make sure you see what you want to see in different use cases. Now let’s dive into what actually, when we are here in ClickUp and like, I can talk a lot, right? When we are right here in ClickUp, what is a custom view and how can we actually set those up? As I said, custom views is a filter and grouping of the tasks shown.[00:02:00]
[00:02:00] And that can be done in your everything view that can be done on folder level that can be done on list level that can be done anywhere. In any of these views, you see right up here. Now, how we do build custom views is by choosing our grouping. There is multiple different areas where you can group them by, then you can choose.
[00:02:25] Do you want to show subtask or not? We also have filters in here, which you can double up and triple up with multiple different variations of data points that you want to be shown. You also can choose your me mode, meaning all of your tasks are being shown or specific assignees. We will dive deeper into those settings here in just a second.
[00:02:53] When I show you multiple different use cases to use these custom views. So as [00:03:00] I already hinted, there is many, many, many, many different ways to use custom views right here in ClickUp for your use. You might have seen the on fire list that you can see right here in one of my past videos before, where it’s originally grouped by priority.
[00:03:20] So if you use your priority flag, that is the first grouping. That’s why you see the normal flag right there and no priority. We don’t use the priority flag often. And then the second sorting is by due date. This is one of the most simple custom use to set up yet. One of the most impactful ones, and we set that up at everything.
[00:03:38] You also can filter these by specific locations. So, when you are, and this is location list, not your location custom field or anything, this is location list. And you can choose which ones of the ones you want to see, because if you are following my recommendation of the standard [00:04:00] spaces, you will have an area that is your library or your company hub, where it’s a collection of assets that you don’t necessarily want to see in here.
[00:04:12] So with that, you want to make sure you really just show your clients, your customer success. I need the content creation. We do want to have the admin and we don’t want the content database simply because those are library assets rather than actionable. Another use case scenario that you probably have seen in my video, how we manage our short form content is based on some custom fields.
[00:04:39] In this case, it’s our short form content creation, and we needed a view that only showed our Instagram content. That only showed our YouTube content. And that only showed our Tiktok content. However, we also want to see the past Instagram published content. And this is exactly where custom views are really, really making [00:05:00] life so much easier.
[00:05:02] Now I know not everybody creates as much content as I do. So I also wanted to really dive into how custom views allow you to build more of use case scenarios rather than, Hey, this is the content I want to publish there or here. So as you can see right here, you are in my Client CRM that is built right here in ClickUp and in my leads and clients list.
[00:05:26] This is where I manage all of my leads, active clients, passive clients, and all the things that is happening with clients. So with this, I have different stages that clients are going through where in that lead process, we have an initial email, we have a no reply follow up, we have a magic email, we have our service recommendations, as well as our actual lead stages of we are in the talks, we won the client.
[00:05:56] We lost the client client. They’re not ready for us yet. I referred [00:06:00] them to somebody else. They’re not a fit. And some other things. So with this, this is a custom view that allows me to keep track on where in this process, my clients are. Now, when I’m on the call with a client, that stage does not matter.
[00:06:17] What I need to know is the client information. And as you only partially can see, because my editor blurred out the personal information. This is company information of how big is that team? How many clients do they serve? Does that team work on an eight hour day or 24 hour day? Who oversees project management? And all these additional information.
[00:06:41] This is the information that I need when I’m on a call with them. I don’t need to know where in the stage that I’m on a call with them on, on a discovery call. Cool. This is again, where custom views are a godsend because now you have your use case scenario of client follow up, [00:07:00] who just went a little bit stale? Who do I need to follow up with? Cool. Who do I have discovery calls with? Who never replied? That is your lead stages.
[00:07:09] Then we have the lead info. When you are on the call with them, who am I talking to? What are the issues? What are we even talking about? As you can see right here in my active client list, this is grouped by none because all of these clients are active.
[00:07:21] We do expense subtasks. So when I set a subtask of, Hey, follow up or schedule this or do that, I see this right away and it only has. One single filter, which is active client. This is why they’re here. Now, this list is also specifically laid out to know actively what am I working with them on, what is the service they have, who referred me to them. To have that big overview of really quick:
[00:07:54] I’m working with you. What’s, what’s going on. I’ve been on vacation for two weeks. Let me [00:08:00] refresh my brain. So I know exactly what is going on.
[00:08:05] When you get in a really specialized custom view, like we have for our short form content creation or right here in my podcast, where there is a lot of stuff going on.
[00:08:18] There’s a lot of custom fields that we put in here. There’s a lot of information, a lot of customization, filters, grouping, all the things. You might not want to spend the time to rebuild this when you’re working with a client, or you are setting up your client and you build a custom view for your client in here.
[00:08:37] Here’s my first little pro tip for you. When you go in here, you can go into the menu setting of your custom view. You can save this as a template, make your life easier. You might have spent cost building custom views can take up to half an hour or even an hour with all [00:09:00] the custom fields that are shown with the sorting, how they are all arranged with the filters, with the grouping, with all the things. You don’t want to redo that with that.
[00:09:09] Remember you can template those views, but you also can easily duplicate them. So if you are building multiple different lists that need the same views, you can duplicate things. Or for example, on the short form content example, you need one for Instagram and you need one for TikTok. You build out the one for Instagram. You duplicate this view and just change a couple of the filters because the rest is already done.
[00:09:36] This is how great custom views, right here in ClickUp, can be. Now I want to hear from you. Have you used custom views before? Is this a holy moly! I didn’t even know this is all possible. We here at AskYvi, build custom views for every single use case scenario, because there is so many different things.
[00:09:59] [00:10:00] Where on one hand, Hey, I’m on a call. I need this information. No, I’m actually working on the task. I need this information. Sometimes, I see with clients, the issue that team members don’t know how to find their tasks. A custom view and the everything view will do the job for that, right here in ClickUp. So I really encourage you, go play around with custom views and you have built this custom view right here in ClickUp.
[00:10:27] Make sure the one you regularly use favorites, we have it easily accessible. And now I don’t want to leave you hanging. I do have a video where I specifically dove into the on fire list and how to really make it simple for your team to find all the things they need right here in ClickUp for you. And remember to subscribe because we are bringing you even more custom capabilities right here in ClickUp.
Timestamps
00:00 | Introduction
00:49 | What Are Custom Views in ClickUp
01:14 | Reasons for Using Custom Views features
02:12 | Steps to Configure Custom Views Settings
02:59 | Other Applications of Custom Views
05:02 | How Custom Views Help in Different Scenarios
08:37 | Pro Tip: Reusing Custom Views as a Template
Ready to dive even deeper into ClickUp?
Make sure to subscribe on YouTube and stay in the know about the latest ClickUp features, efficient workflows, automated process, and much more..